
Everyone who has rebuilt Hehr windows from the 50’s knows the work involved in replacing the famous back-frame gaskets. Let me just say, yes there are a lot of parts to clean, put back together with a new gasket, then re-rivet to the trailer. But come on folks, they are handmade pieces of history! Real craftsmanship from a time when what a person made with their hands meant something. In other words, true vintage, and I think they are great.


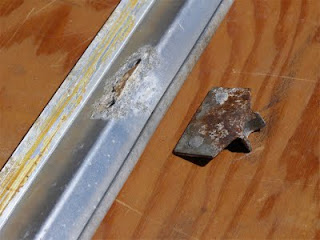 Fifty-six years of a steel latch clip riveted to the aluminum rear window frame caused severe corrosion due to chemical reactions between the two metals. The corrosion was so bad I decided to remove the clip and clean it all up.


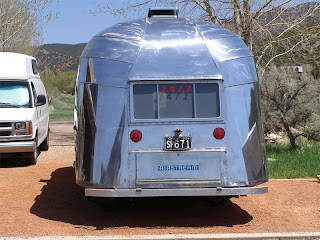

The rear window in our trailer is an emergency exit window. This window has an extra frame mounted permanently in the shell of the trailer which the Hehr window is then mounted into with a hinge at the top. There are two lock down latches at the bottom inside which when released allows the entire window to swing out for exiting in an emergency.

Here you can see the rear window with the drip-edge pulled up exposing the hinge at the top, which allows the entire window to open in case of an emergency.

After removing the entire window back frame and all, I also removed the storage compartment door and old hinge system.

To my surprise they cleaned up much better than I thought they would. Before re-riveting the clip back to the window frame I wrapped it with two layers of electrical tape to prevent contact of the two metals with the hope that it will last another fifty-six years or more.

The rear window has two vertical mullions, one which holds the crank that opens it and one which holds the latch that locks it down. These vertical mullions are also steel riveted to aluminum which again results in corrosion. Before putting it back together I used a piece of folded plactic, seen here, and attatched it to the backside of the mullion using aluminum foil tape. I would have used electrical tape here but it could be seen from the outside.

The gasket that has to be glued to the back of the frame before reinstalling must be held firmly in place while the glue sets up. I made a couple of small wooden corners to use whenever adhereing these gaskets to hold them against the window frame. The adhesive I used was TremPro 644 RTV silicone.

I used aluminum foil tape to seal the seams on the inside edges of all corners, then put a nice bead of the 644 silicone on the opposite side of the foil (outside edges) as extra insurance against moisture getting past the gasket.

After putting everything back together I changed from normal window screen to a special sun-shade screen which helps keep the rear bedroom area cooler in the summer. This screen's over all gray color looks good too.

Now I turned my attention to the rear storage door and hinge. The rear storage door on our trailer is also made by Hehr, or at least the hinge for it was. The hinges on the 50’s Hehr windows have a nice hook-over and loop-into sheet metal hinge system which works very well. This design is still used today by most RV and camper shell window makers. (Of course they are all extruded aluminum or plastic and not re-buildable in today’s throwaway world.) However when this hinge design is turned upside down, as it is on my rear storage door, see photo above, it acts as a catch-all for everything you don’t want it to catch, like water, snow and dirt. All of these things only serve to make the hinge work less correctly over time and our trailer has 56 years of time, so I was determined to change this upside down hinge to a better aluminum piano hinge. The following photos show what I did to correct the problem.

Here you can see the hooked sheet metal on the bottom of the door which is part of the Hehr hinge and the catcher of rain, snow and dirt.

Normally this part of the door hinge would not be removed, simply cleaned and polished along with the door but I wanted to replace it.

Here is the four inch piano hinge I bought from Fastenal, a company I never heard of until reading a post by Doug Bakken who publishes a blog named, Just Streamin' 54 Cruiser "Nellie" where he wrote about aluminum piano hinges from Fastenal. Just what I was looking for! I went on-line to learn there is a Fastenal store 20 miles from me, in Cedar City, Utah.

Now the trick was to bend the hinge into the configuration needed so the storage door would properly seal against the gasket. After I cleaned the door and put it back together, I held it firmly in place and made a wire template of the bends needed for the hinge.

The next best thing to owning your own sheet metal break is having an ol' friend who has one. Friend, Tom Harris, matched the wire template exactly. Here he holds the results.

With the door cleaned and polished and hinge attached with Olympic rivets and TremPro 636 (previously Vulkem) it was ready to be put back in place.

I love it when a plan comes together. Old Hehr upside down hinge out, new Spike-styled hinge in!

Now on to a few other things....My 40-something son, Paul, who doesn't mind working his tail off came up a couple of weekends from Las Vegas to help his ol' man do some polishing. He's more than willing to find time to help me fix up the old Moonshadow. It probably has something to do with the fact that I've told him, if he doesn't want to inherit it, I'm going to be buried in it.

Paul thought it was easier to work on the top of the trailer from the vent holes rather than climbing around the outside on a ladder. So I said go for it!

With the drip-edge reinstalled over the rear window and storage door, along with more polishing the rear end is looking better.

Most of the first step of polishing is completed. We are about ready to head for the Four Corners Unit Restoration Rally in Albuquerque where we'll learn what to do next.